Auto Generate PDF Documents with Power Automate
October 15, 2021
By Pete Majer
Power Automate is a very powerful tool if you know how to wield it correctly. Over the course of my career, I’ve run across many different business requirements, and in most required custom development in the past.
A common requirement I’ve seen is to auto-generate documentation based on data within D365. Before having this auto-generation in place, users would manually create the documents by copying and pasting data which is error-prone on top of being time consuming.
Over the years Microsoft has extended the Power Platform and D365 to allow power users to be able to extend the product on their own without developers. In this post, we’ll walk through leveraging those tools to be able to configure the system to automatically generate a PDF document and attach it to a CRM email (spoiler alert – I used a developer’s assistance for some of the actions in the Power Automate which I’ll walk through below).
Overview + Getting Started
The first thing you’ll need is to have a Word Template created for the document you want to generate. I won’t be walking through setting up a Word Template in this post. However, you can navigate to Microsoft’s documentation on Word Templates to get started.
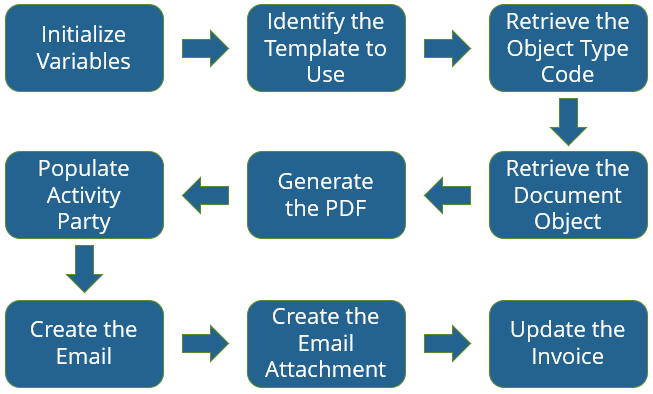
Here are the high-level Power Automate steps that created the records needed. We’ll dive deeper into more detail on each of these steps later.
Leveraging the "Filter Rows" functionality on the trigger
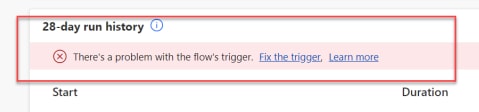
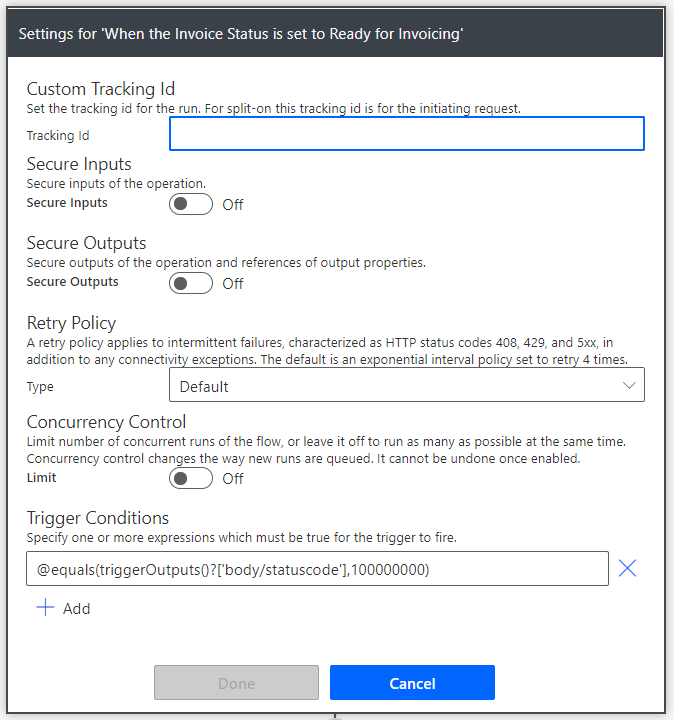
The first thing to note is that when I was creating this solution, I ran into an issue leveraging the “Filter Rows” functionality on the trigger. I wanted my Power Automate to only run when my Invoice is updated to a specific status, so I had entered in the following value for “Filter Rows”, but was receiving a message that there was a problem with my flow’s trigger.
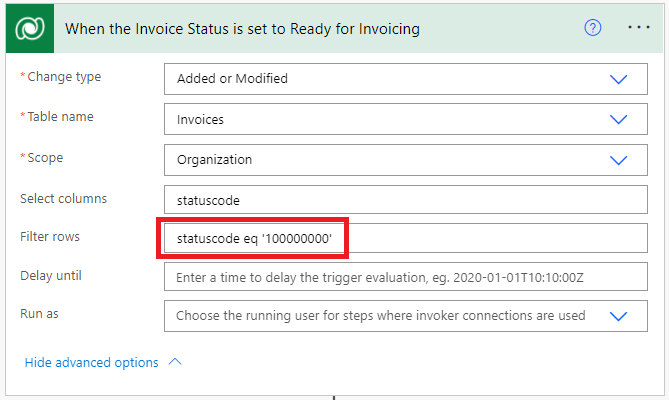
Head over to this blog to find out more about leveraging Trigger Conditions instead. After I updated my trigger step to have the Trigger Condition as below (and removed the Filter Rows text I had entered), my trigger was fixed.
Set-up Power Automate
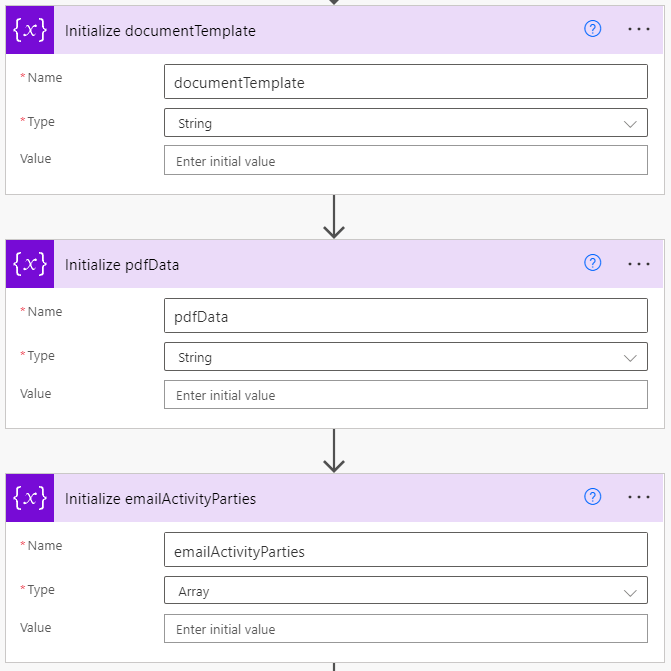
Next, there are 3 variables you need to set up to use in the Power Automate. Two String variables and an Array variable that will end up holding our Activity Parties (From, To, CC, BCC) that we’ll use on our email.
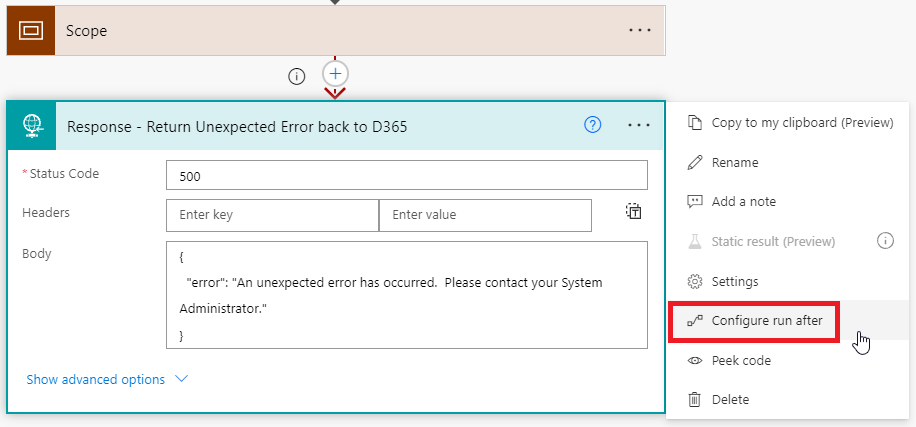
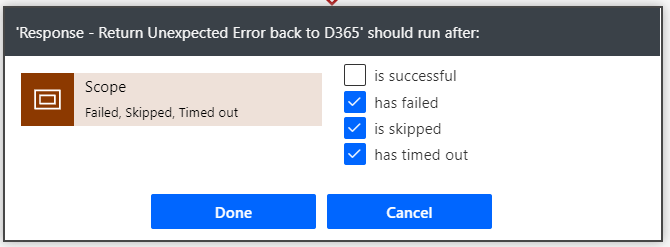
Another good practice is to leverage a Scope action for the majority of the Power Automate processing. You can configure steps after the scope to “Configure run after” and select the options other than “is successful.” This will allow you to catch any unexpected errors that happen in your Power Automate and take action upon them (such as sending an HTTP response back if you created a custom button to call the Power Automate – the custom button can display the error message sent back).
Now to the heavy lifting of the Power Automate that will generate our PDF document, create a CRM Email, and attach the PDF to the Email record automatically.
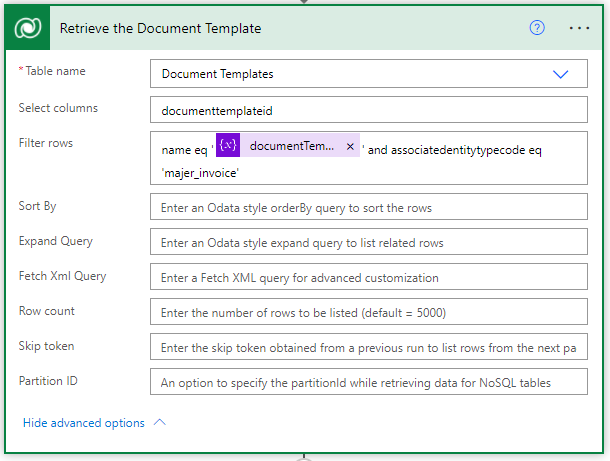
Find the right Document Template to use
Our next set of steps leverages the Invoice Type field on our Invoice that indicates if the invoice is a “detailed” or “summary” version. You can also have client specific invoice templates if you’d like, but this section will find the right invoice based on your data in D365.
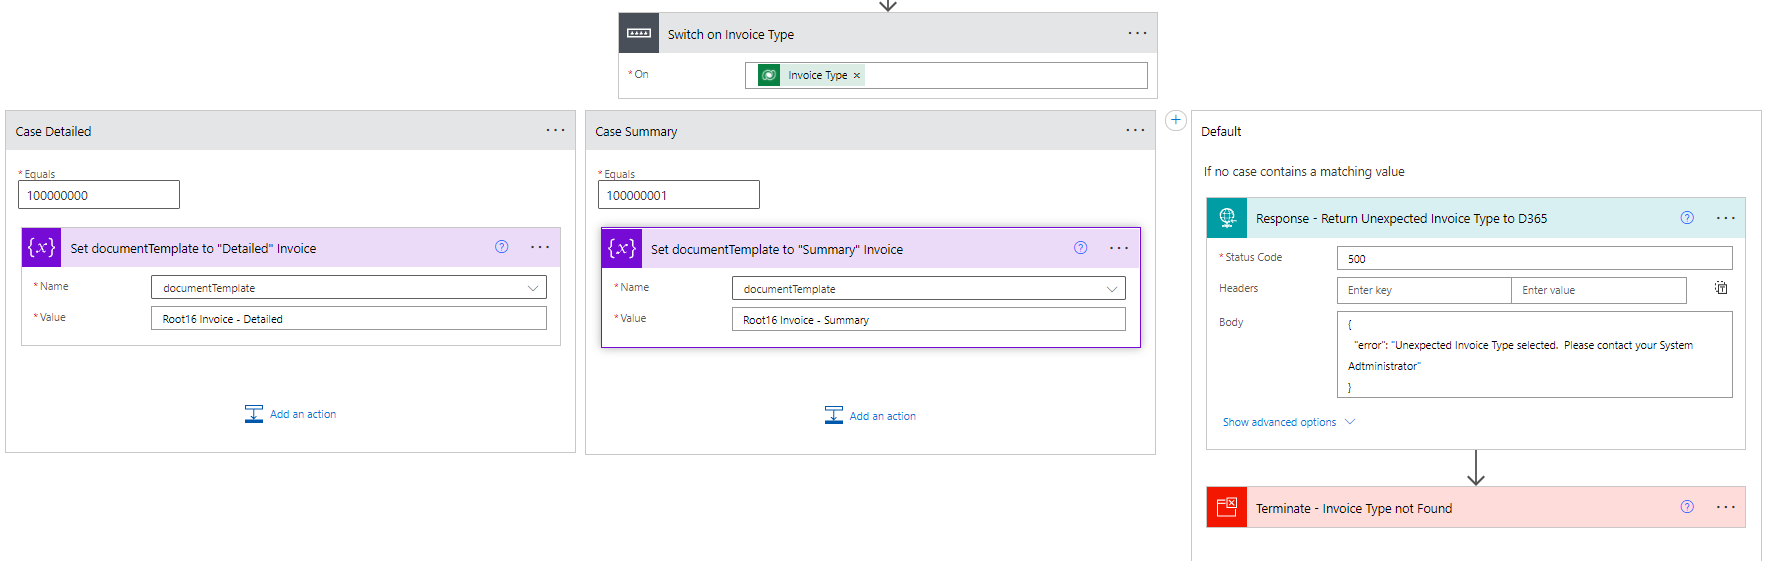
You’ll notice I also have a default action that returns an HTTP Response in case the your data in D365 has a value on Invoice Type that you’re not accounting for. This scenario could be if an administrator updated the Choice field and added a new option, without updating the Power Automate. This response could be surfaced to the end users by adding a little bit of code that initiates the flow, and waits for the response.
Retrieve and Parse the ObjectTypeCode
Next we need to grab the ObjectTypeCode so that when we deploy this Power Automate to other environments, we’re not hardcoding this value. Unfortunately, when you push a custom table from environment to environment, the ObjectTypeCode does not remain the same. Therefore, we cannot assume our custom majer_invoice entity will have the same code in Dev versus Test versus Prod.
In order to accomplish this, we’ll add an “Invoke an HTTP Request” action followed by a “Parse JSON” action.
In the “Invoke an HTTP Request” action we leverage this expression:
uriHost(body(‘Retrieve_the_Invoice’)?[‘@odata.context’])
This expression will dynamically retrieve the begging part of your environments URI such as “majer.crm.dynamics.com” – again, very important if you’re deploying your Power Automate across environments where you don’t want to hard code the environment URI.
The “Invoke an HTTP Request” action also performs a GET on EntityDefinitions API passing in our entity name, and what we want to select which is the ObjectTypeCode.
The “Parse JSON” step then is used to pick out properties we care about from the results of the “Invoke an HTTP Request” action so that we can leverage them easier in later steps of the Power Automate without having to write expressions.
You can leverage output of a previous Power Automate run of the HTTP Request step, and paste it into the Parse JSON step when clicking the “Generate from Sample” button to see what properties were returned. This way you can remove what you don’t need and in our case we just care about the “ObjectTypeCode” property.
Generate the PDF
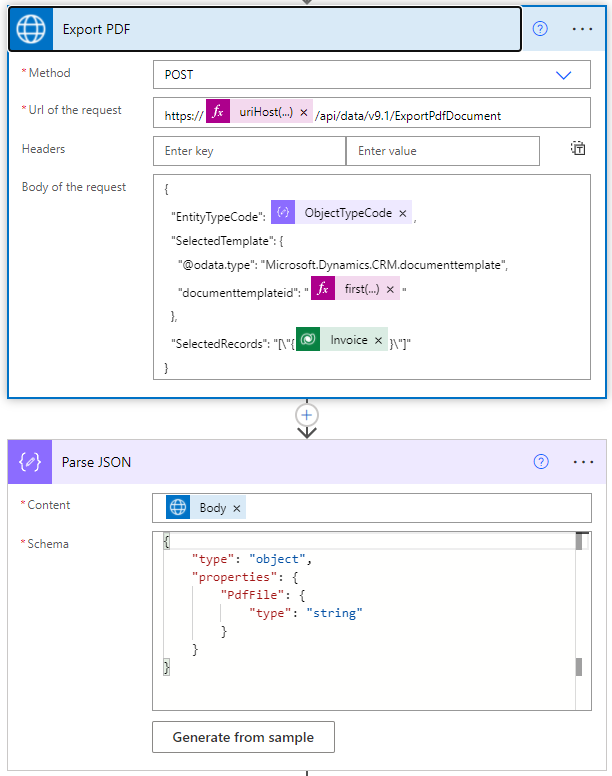
Our next set of actions will generate the actual PDF bits and bytes leveraging another “Invoke an HTTP Request” action followed by another “Parse JSON” action. These actions are similar to the two from above that we used to retrieve the ObjectTypeCode.
However, in these actions we pass in the ObjectTypeCode, Document Template ID, and Invoice ID from previous steps. We’re also performing a POST HTTP Request instead of a GET, and leveraging the ExportPdfDocument API method.
Similar to above where we parsed the JSON to retrieve just the ObjectTypeCode property we needed, in these steps we’re parsing the JSON to retrieve the PefFile raw document data.
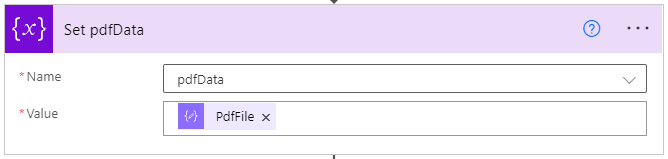
After we have that parsed JSON, we put it in our pdfData variable that we’ll use later in our Power Automate.
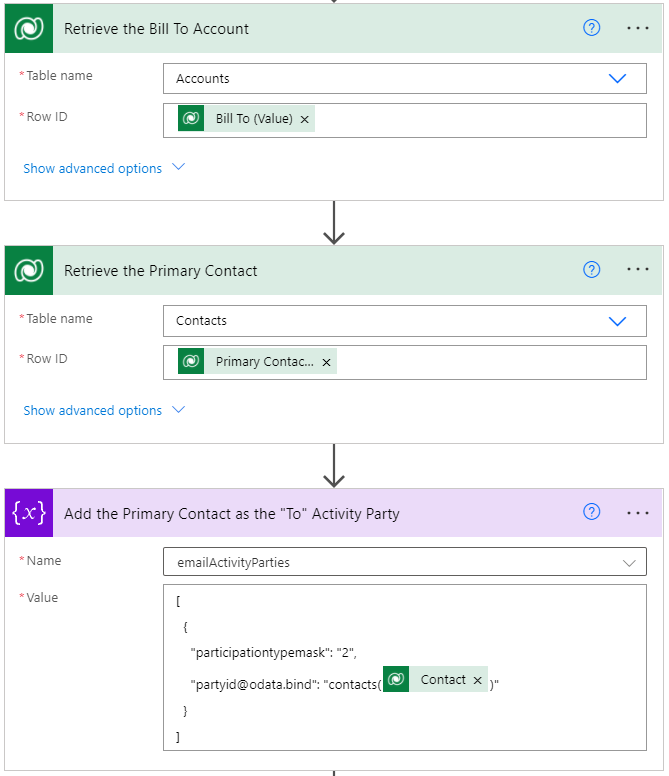
Begin the Activity Party Array
The next few actions will be to grab the Bill To Account from the Invoice, then the Primary Contact on that Bill To Account, and then finally adding that Contact to the emailActivityParties Array variable we initialized earlier.
You can optionally add in check conditions in case your Bill To Account and Primary Contact fields are not required and blank. If that’s the case, you’ll get an error when you create your Email later on with this emailActivityParties variable.
For our Array variable, the square brackets [ ] indicate that this is an array, and the curly brackets { } indicate this is an object or item in the array. Looking at the Activity Party table, you’re able to see there are only 2 fields you need which are the Party member (Primary Contact in this case), and Participation Type (1 = From, 2 = To, 3 = CC, 4 = BCC). Since this is who the email is going to, set the Participation Type to 2, and set the Party value using odata.bind.
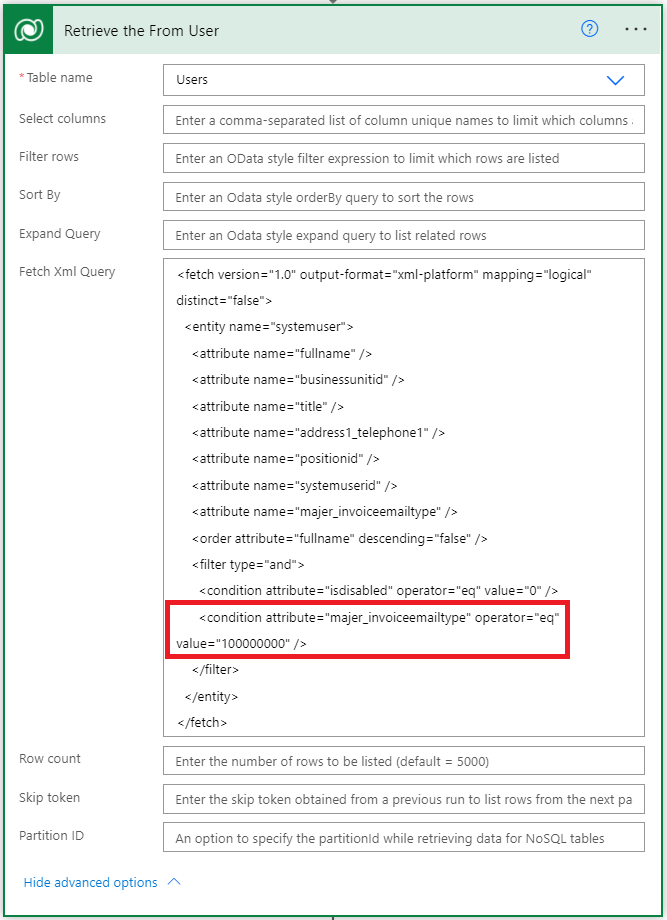
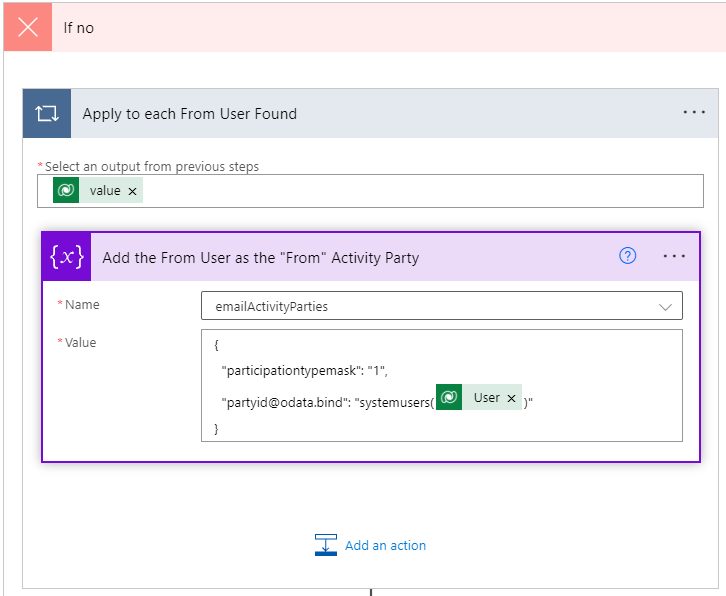
The next set of steps will fill out the rest of the emailActivityParties array (the From, CC, and BCC). An email has to have a From and a To on it, but the CC and BCC are optional. A custom field Invoice Email Type was added to the User entity with values of From, CC, and BCC. This field is used in FetchXML (which can be downloaded by creating your query in Advanced Find, and clicking the Download FetchXML button) in a List Rows action.
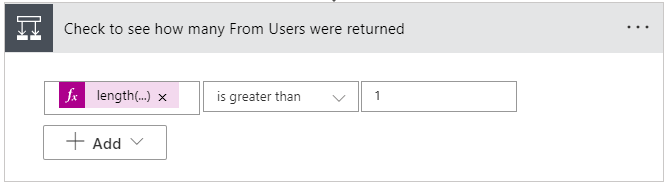
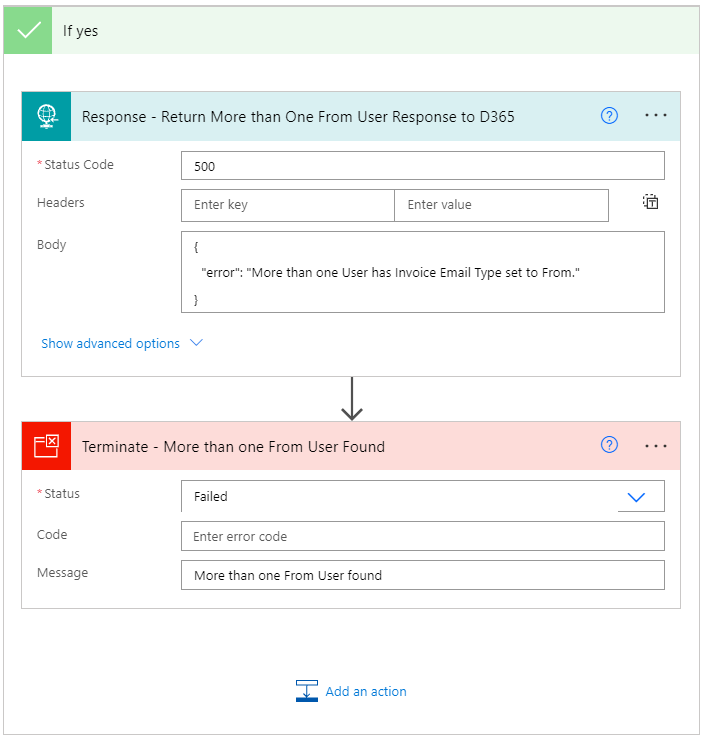
Next, a check is performed to ensure no more than one User is designated as the From User since an email can’t come from multiple email addresses at the same time! If you have more than one User designated as the user the email comes From, send back an error messages response and terminate the Power Automate. Otherwise, continue on.
Since you know you don’t have more than one From User, you can simply add that user to the emailActivityParties array variable as you did previously with the Primary Contact who the email is going To.
Finalize the Activity Party
Let’s finalize this PARTY!!!
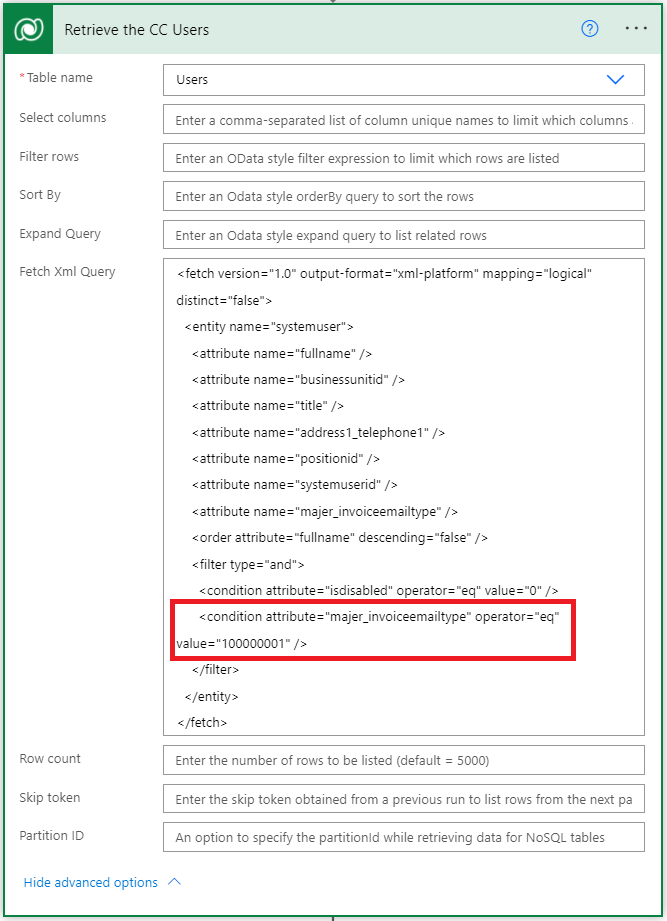
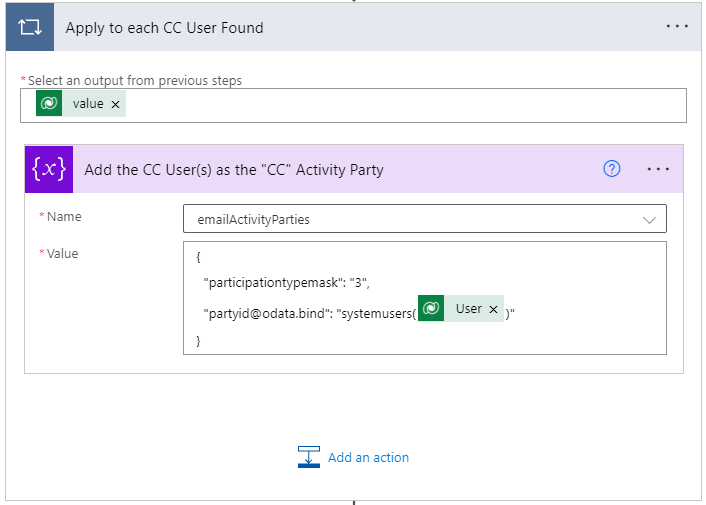
The next four steps use similar actions already performed above to 1) Retrieve the CC Users in a List Rows step but slightly different FetchXML, 2) Add the CC Users to the emailActivityParties array variable, 3) Retrieve the BCC Users in a List Rows step but slightly different FetchXML, and 4) Add the BCC Users to the emailActivityParties array variable.


Create the Email
All that remains now is to create the Email, add the Attachment, and update the Invoice Status indicating the Invoice was Generated. All the hard word has been completed above, and now you just need to use Outputs of those Actions to finalize this Power Automate.
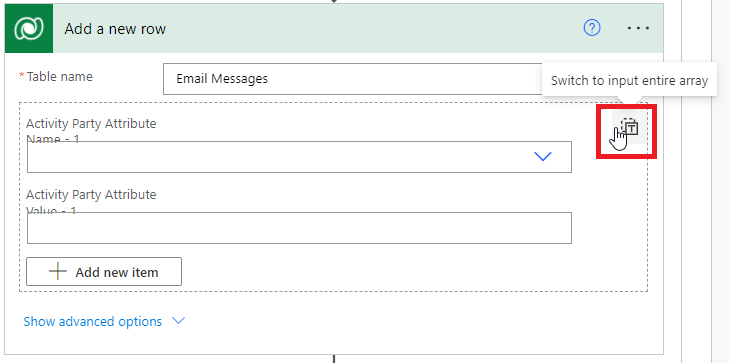
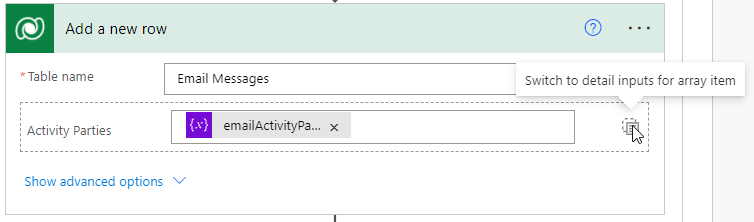
Let’s start by creating the Email record using a Dataverse “Add a new row” action. When you add the “Add a new row” Dataverse action, and select “Email Messages” for the table, you’ll initially see the “Activity Party” attribute in a Detail view. Click the T icon in the top right corner to “Switch to input entire array”. You can always switch back to “detail inputs for array item”. However, using the array variable in our approach allowed us to dynamically the entire the entire Activity Party array in one step, versus having to manually add members to the Email record in multiple update steps. Below you’ll see we populated our variable in the Activity Parties field.
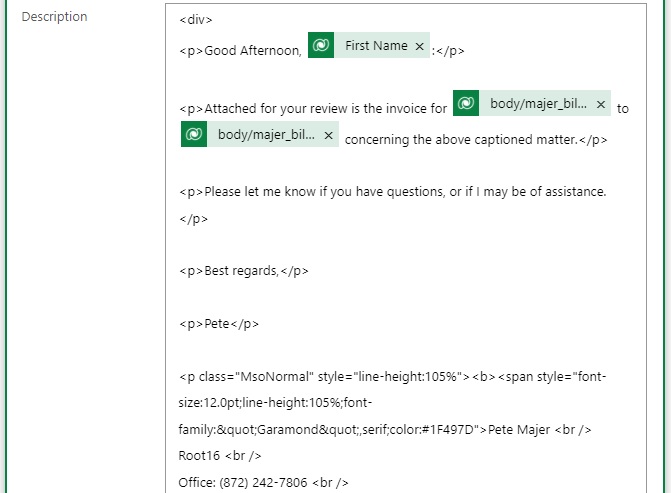
You can leverage HTML to have a better formatted email Body. Don’t forget to update the Regarding using the plural name of your custom table. Now you’re ready to add your Attachment to the Email.
Create the Attachment and Update the Invoice
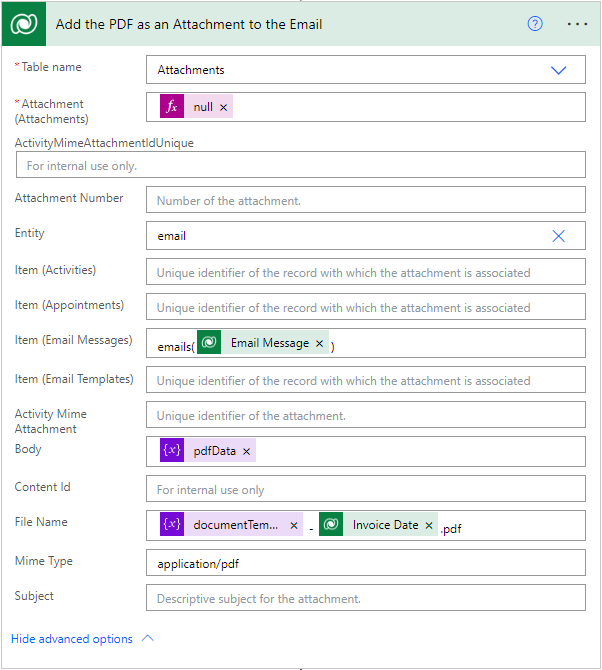
When selecting Attachments in the next “Add a new row” step, make sure to select the top one as there are two listed. The top one contains the field “item (Email Messages)” allowing you to link the attachment to the Email you created in the previous step.
For the “Entity” field, click on “Enter custom value” and type in “email”.
The “Mime Type” should be set to “application/pdf”.
For the “Attachment (Attachments)” required field, insert the “null” expression. This is required so that the system can generate the Attachment GUID.
Finally, provide your attachment a friendly file name.
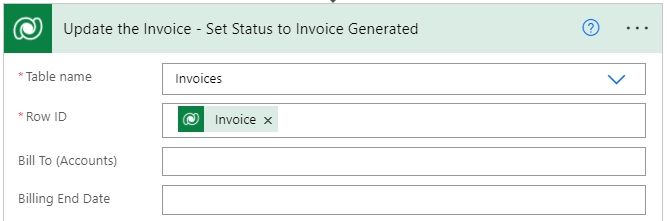
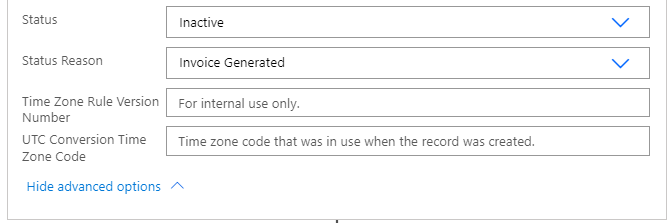
Since the Email and Attachment have been successfully created, the next step is to update the Invoice Status Reason to indicate the Invoice was Generated.
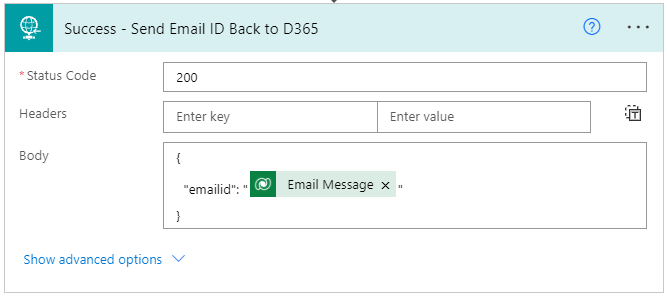
The final (optional) steps are to 1) send a successful response back to D365 should there be custom development waiting for a response, and 2) after the Scope sending an “unexpected error” message back (this action was described above when discussing wrapping the logic in a scope action).
And that's it!
A lot of steps and details on what needs to be done, and some of the actions are optional (such as multiple Document Templates, dynamically adding the Activity Parties, wrapping the logic in a Scope, providing HTTP Response messages back, etc.).
However, this Power Automate is very powerful and can easily be deployed to other environments should you need to promote it from Dev to Test to Prod for your traditional SDLC process.